I have been asked by some of my docraft buddies how to make one of these for some time now.


They will be pleased to know I have finally gotten around to it
This tutorial is for the the holder that will fit four of these milk cartons in it.
This tutorial is for the the holder that will fit four of these milk cartons in it.
For this tutorial I am using my hougie board for speed but you could quite easily use a ruler and a scoring tool and just follow the measurements given
Cardseock you will need:
2 pieces measuring 20.5 cms x 13.5 cms
2 pieces measuring 29.5 cms x 14.5 cms
1 piece measuring 15 cms x 14.5 cms

Take the 2 pieces measuring 20.5 cms x 13.5 cms and score/fold
around all four sides at 3cms

Trim a little notch as shown from all four corners ( the same as you would to make a box)

Place adhesive on the corner tab and secure and shown to make your "box"

Repeat for both pieces and you will end up with 2 boxes, as shown below
For me a strong wet glue is a must as it bonds the fibres of the card together . I know some people will recommend the super sticky red backed tape and I have used this in the past. However I always go back to a wet glue because I find I need a little more flexibility when fixing things. With a tape once it's stuck it's stuck, with a wet glue you have a few seconds to manoeuvre things into place. I suppose the one downside is that you do have to use something to hold it in place whilst you wait for it to dry, as I have below but if you use a quick drying glue then it should really only be a couple of minutes...Just my personal choice of course, do whatever suits you.
Here is what you should end up with times 2

So while I wait for my "boxes" to dry we'll move on to the handle
For this tutorial I am cutting my hole for the handle with a circle nestability
You could use an oval or any large punches you may have
You could use an oval or any large punches you may have
Take the two pieces of cardstock measuring 29.5 cms x 14.5 cms
( As you can see I have rounded off the top corners using a papermania punch but you could omit this step if you wish)

As shown below, make a pencil mark at the top measuring in around 1.5 cms and another a few centimetres further down marking the center point of the width (7.25cm) This does not have to spot on as we are only using it as a guide for placing the nestie or punch used for cutting our handle

We need to cut both pieces of card at the same time to get perfect alignment for the handle holes so
lay one piece of card on top of the other , ensuring that they stay perfectly aligned at all times .( I find keeping them aligned quite easy but you could secure with a piece of very low tack tape)
( you must also remember at this point that if you are using a patterned or textured cardstock
to place the two patterned or textured sides facing outwards)
( you must also remember at this point that if you are using a patterned or textured cardstock
to place the two patterned or textured sides facing outwards)
( if you are using a punch , simply punch your first piece, lay that ontop of the other peice (perfectly aligned) draw around the punch out and line your punch up with the lines when you punch)
Place you nestability as shown in the picture .
But the edge up to the mark you made 1.5cms from the edge
and use the central mark as a guide to get your cut central.
But the edge up to the mark you made 1.5cms from the edge
and use the central mark as a guide to get your cut central.

You should end up with 2 pieces like this

Place you nestie under the right side of the cardstock and embossing with a ball tool
( I find this easier than faffing trying to put them back through the diecutter especially with such a simple shape as this)

Now score/fold both pieces as shown at 7.5 cms from the bottom

Now we are ready to assemble
Cover the small section at the bottom with adhesive

and place inside the box as below
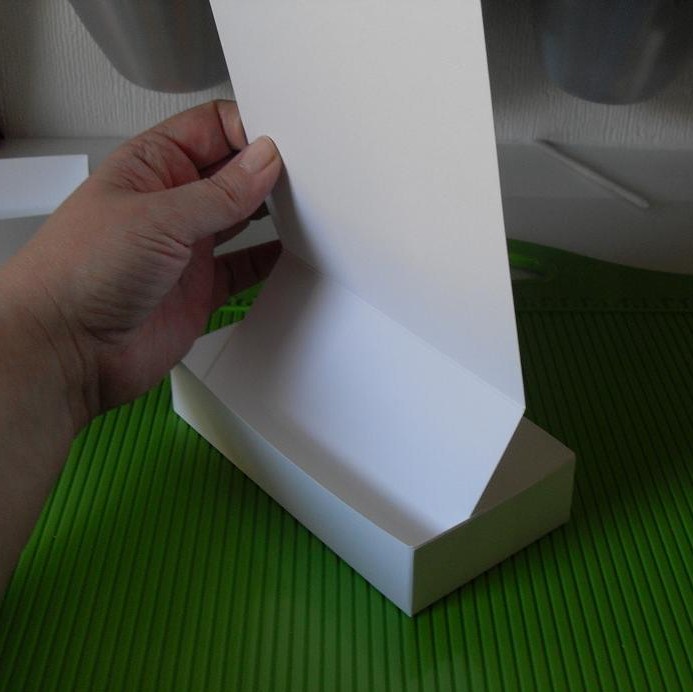
smooth down with a bone folder or similar
(boy don't my hands look fat) lol
(boy don't my hands look fat) lol
Place some more adhesive down along the back panel where the base meets the handle

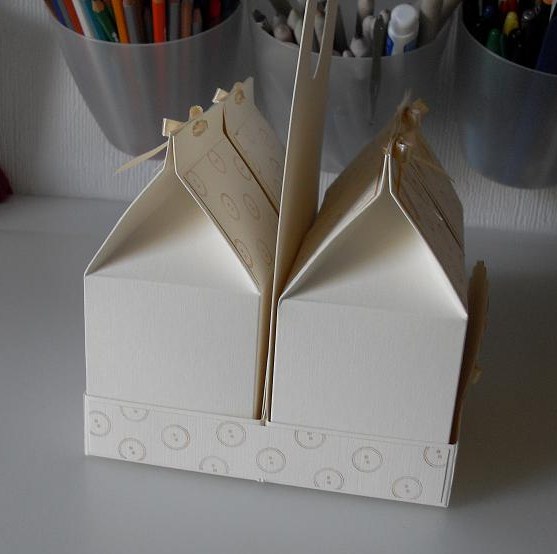
repeat for the second side and you should have this

now we join them together
cover the back of one half in adhesive and join together as shown

you should end up with this

now for the final step
Cover the bottom of you holder with glue
and adhere the last piece of card measuring 15 cms x 14.5 cms

this is the part which adds all the strength and stability to the design

And that's it! you can now decorate as you wish
And voila in true blue peter sytlee..here's the one I made earlier lol

All I did to this one was add four thin strips of stamped card along the edges of the "boxes"
I would probably always do that because it hides the join (see below)
And a couple of stamped images cut out with nesties
I hope this tutorial has been of use to you and is understandable.
But as always, if there is anything you are struggling with and need help
please feel free to either chatbox me or email me (from my profile)
But as always, if there is anything you are struggling with and need help
please feel free to either chatbox me or email me (from my profile)
TFSB
Kerry x
Well after all that it just suddenly popped into my head this morning that why didn't I just make the bottom tray out of one piece of card?? doh!
1 piece of card measuring 20.5 x 21 cm score all the way around at 3cms and cut and assembled as shown above (like you would a box)?
The above tut works perfectly well of course but it is much less time consuming and a bit neater with just the one piece. I will edit this post at a later date :)